Basic usage
Introduction
There are two ways to use Partition Image:
- By typing a command with all arguments
For example:
partimage -od -f1 -z1 save /dev/hda12 /mnt/backup/hda12.partimg.gz - By using the semi-graphical interface This is an easy way: you just have to fill in the boxes in the GUI window.
You can obtain the list of all commands, by typing partimage --help
so they won’t be explained here.
Main screen
How to save a partition into an image file
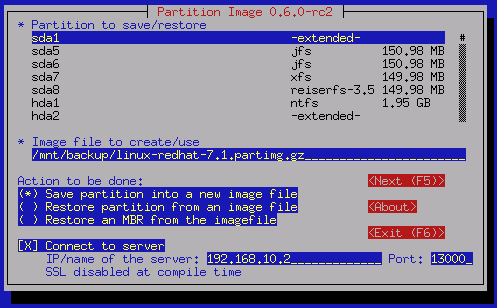
When saving a partition, you must specify two important things. First, the partition you want to save. You must give the Linux name of the partition, then a file of the /dev/ directory. For example, if the partition to save is the first of your first IDE hard disk, it might be /dev/hda1. The second important thing is the file where to save this partition. This file is called the image file. To see what partitions your have on your hard disk, you can run fdisk or, you can type cat /proc/partitions. Then, you will have to type this information on the first window of Partition Image. In the screenshot, we are saving the /dev/hda12 partition to redhat-6.2.partimg.gz. The extension of the image file should fit with the compression mode which will be used (.gz for gzip, and .bz2 for bzip2). When ready, click on Next >
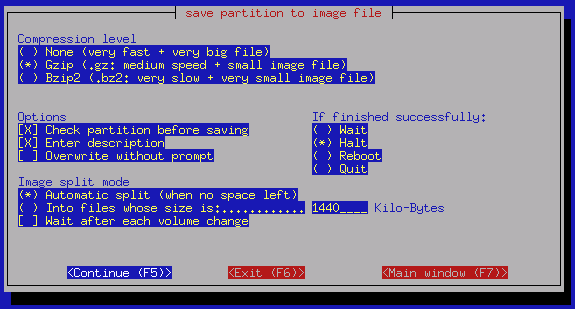
On the next window, you can choose many options. The most important one is the compression level. The size of your image, and the time which will be used to save the image depend on the compression level you use. The split options allow you to split the image file into several small files. It can be useful to save your partition into removable media, such ZIP drives. For example, you can split into files of 95 MB to fit on multiple Zip disks.
When all options are set, you can click on the save button to run the operation.
How to restore a partition from an image file
 Restoring data will
copy the data which were saved into an image file, into a partition.
Data already on the partition you are restoring to will be lost! The
partition to restore data to must already exist before you proceed. If
it doesn’t exist, you must create it before with a tool, such as fdisk,
GNU parted, or other tools. You won’t be able to restore information if
it won’t fit in the new partition, so make sure you create one with
enough space.
Restoring data will
copy the data which were saved into an image file, into a partition.
Data already on the partition you are restoring to will be lost! The
partition to restore data to must already exist before you proceed. If
it doesn’t exist, you must create it before with a tool, such as fdisk,
GNU parted, or other tools. You won’t be able to restore information if
it won’t fit in the new partition, so make sure you create one with
enough space.
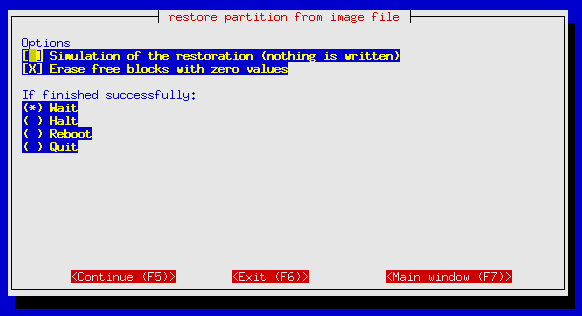
Restoring an image into a partition is an easy operation. You must specify the image file to use (it will only be read), and the partition to restore (it will be overwritten). The only extra option you can choose is Erase free blocks with zero values. If this option is enabled, all blocks which are not used are erased with zero bytes. This may be useful if you want to be sure that the data which were on the partition before this operation are fully erased. If this option is disabled, old data which was on currently unused blocks can be accessed (with some difficulty), because nothing is written on these blocks. These old data can be read with tools such as dd (GNU convert and copy).
When all options are set, you can click on the restore button to run the operation.
The partition to restore must have the same size as the saved partition. If the partition is smaller than the original one, the operation will fail. If it is bigger, space can be lost. You can read the FAQ of this handbook, for more details about this.
What compression level to use ?
When you save a partition into an image file, you can choose one of four compression levels:
- none There is no compression
- gzip Image will be compressed with gzip (default)
- bzip2 Image will be compressed with bzip2
- lzo Image will be compressed with lzo
With No compression you will have a very big image file, which will have the same size of the used data of your saved partition. This is really interesting only if you have a lot of space. But this is very fast, and useful if you are dealing with small images (your /boot partition perhaps)
With Gzip compression you will have a small image file. This is the most useful mode, and the default setting. This operation takes more time due to the compression, but it creates a much smaller file.
With Bzip2 compression you will have a very small image file: Bzip2 has a better compression ratio than gzip on big files (though in some rare cases, it can actually create a bigger archive files). This will be very very slow to compress. This option is useful only if you really can’t waste any space, or if you have a lot of time (you can run it before going to bed).
With Lzo compression this is a very fast compression algorithm. It’s a lot faster than gzip, but a little less efficient. Choose this option if you have enough space to save a big image, and you want to save time. This compression level is available for version 0.7.0 of partimage and later.
You can compress and uncompress image files, after creation. For example, if the image redhat-6.2.partimg.gz was made with the gzip compression level, you can type gzip -d redhat-6.2.partimg.gz to uncompress the image file. You can also compress an image which was not compressed. For example, you can type bzip2 debian-2.2.partimg. This may be usful if you wish to experiment with other compression utilities. Partition Image will be able to read uncompressed files, or those created using a supported compression routine even though the software itself was not used for the compression. It is really recommended to use compression as it will be reduce the image file size quite a lot which can be very useful if you plan to store it on either removable medias or save them online through a dedicated web server.
The splitting option
Image files created by Partition Image are very big, and can reach a size of several Gigabytes sometimes. This can be inconvenient if you want to copy the files onto removeable Media, or burn CD-R discs from them for storage.
Splitting is an option to use when creating an image. It makes it possible to create a number of smaller files containing the partition image rather than one large one. Two splitting modes are available
- Automatic: when no space left A new volume will be created when there is no space left on the currently selected device. Then you will be asked for a new location to save the next part of the image.
- Into files of a fixed size Several files of this size will be created instead of one big file.
You can use the fixed size mode if you want to copy your files onto removable media, or CD-R. For example, to burn your image onto CD, you might want to split it into files of 600 MB. Then, you can specify a fixed size to use, in Kilobytes (in this example, it would be 614400 KB).
You can choose the automatic mode if you are not sure if there is enough space on a device for the destination image file. Then, if you run out of space, you will be asked for a new location, and the next part of the image will be written in this new location. This can be useful if you directly create your partition into a removable media.
Where to save the image file
You can save the image file on any support where the running linux kernel is able to write. It means you can write the image file on an NTFS partition using Ntfs3g, on a Reiser4 partition (Partimage does not know the Reiser4 filesystem but a patched linux-2.6 knows it). It’s important to choose a filesystem that support large files (files larger than 2GB). Most modern filesystems are ready: you can choose Ntfs if you have a Windows based computer (write on this filesystem with ntfs3g) or ext2 / ext3 / reiser-3.6 / xfs / jfs filesystems for linux. Try to avoid the FAT partitions that are not reliable, and reiser-3.5 that does not support large files.