Network support
About
Since stable version 0.6.0, Partition Image provides network support: it allows you to save the image from one computer (the client) onto another computer (the server)over a standard network. You can also restore a partition to a computer (the client) from the image stored on another computer (the server). This method provides SSL encryption support if the partition you save/restore contains data which needs to be kept secure. The server can work with several clients connected at the same time.
The network support is very useful in several cases:
- If there is only one partition on the computer whose disk is to be backed up. In this case there is no spare partition to save the image to.
- If you don’t have enough space to save the image file on the same computer.
- To increase the security: if the image file is stored on another computer, a disk crash or a virus on the client cannot damage the image file.
- If you have the same image file for several computers, which have the same partitions and the same software installed.
If the shared version of OpenSSL is installed on your computer (it must have been compiled with ./config –prefix=/usr -shared), then the SSL encryption is enabled by default.
There are two versions of partition image to use, and two kinds of computers: All the computers used in network operations must have a valid network configuration. You can use netcfg to do it.
If you have problems using the network support provided with Partimage, you can try to access your imagefile with a network filesystem such as Samba (Windows networks) or NFS (Linux/UNIX networks). Have a look at the last section of this page for more details
The server
The server is the computer which contains the image files. No partition is directly saved/restored on this computer.
First, you have to add a user partimag because the server will lose root capabilities as soon as possible (for security) and will continue to run under uid partimag. Don’t make partimaged SUID, run it as root. Make a note of the IP address of the server, as you will need this for configuring the clients. If you are unsure of the address, you can run ifconfig . usually you will find the IP details listed under eth0. If you have several ethernet connections, you may have to check what the address is on the network you will be using. Note: If you are using DHCP on your network, you cannot rely on the fact that the server will always have the same IP address. In these cases it is better to assign a static IP address to the server.
By default the server software uses a login as a security measure to avoid giving read/write access to the image files to any user. This check can be disabled at compilation time, by typing ./configure –disable-login, if the security is not important. The first time you use partimaged, you will have to create accounts to allow clients to connect to the server. You must create a file which contains the list of the users which will be allowed to connect. This file is stored as /usr/etc/partimaged/partimagedusers by default. And its access mode must be 600, this file must belong to user ‘partimag’. For example, if you want to allow linus to use the server, type: mkdir /usr/etc/partimaged && echo linus > /usr/etc/partimaged/partimagedusers && chmod 600 /usr/etc/partimaged/partimagedusers. The users added to this file must be existing users of the system (it must have an entry in /etc/passwd). When logging in, the passord must match the password of the user in the system. For the moment, only DES or MD5 passwords are supported, but it’s now a standard.
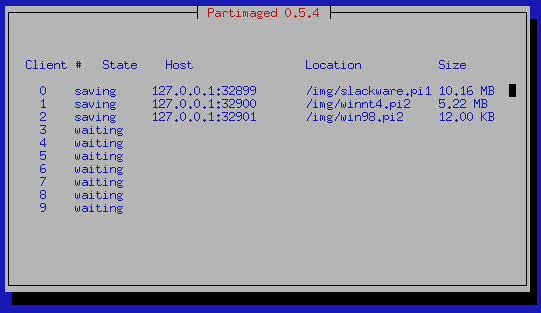
Then run the partimage server version, by typing partimaged. If you want to change some settings, the best option is to specify these on the command line: Type partimaged –help for more information on these. The most important option is -p port which allows you to choose the port which will be used by the server. 4025 is the default port number. If you change this value, make a note of it so you can configure the clients accordingly. For ease of use, you should run partimaged from the directory where the image files are to be saved - then this will be the current directory when no path is chosen by the client. If you intend setting up a permanent server, it may be useful to setup a startup script to initialise the server automatically. The server is now ready to accept up to 10 client connections.
SSL mode
Using SSL requires a certificate and a key file. Both files will be generated using “make certificates” when installing from sources. See FAQ if you don’t have sources or you want to change certificate or key.
Chroot environment
To improve security, you can run the server in chroot jail. Refer to FAQ for more details.
The client
The client is the computer which contains the partition to be saved. The standard version of Partition Image will be used: don’t use partimaged here. The first thing to do is to give partimage the IP address of the server. You can do it by using the -sIP option in the command line. Use -s192.168.10.2 for example. The second way is to check the network box, and to type the IP in the main window.
You can change the port to use with the -pPORT switch. Use -p4001 for example to use the port 4001. The default value is 4205.
All the other steps are the same as when there is no network. Then, the only important thing to change when you use the network is the IP address of the server. All the other steps are the same.
Using a network filesystem
If you have problems using the network support provided with Partimage, you can try to access your imagefile with a network filesystem such as Samba (Windows networks) or NFS (Linux/UNIX networks). It allows you to save/restore an imagefile that is located on another computer (such as a server). For the Partimage point of view, it makes no difference, and you just need to run Partimage from a Linux system that support network filesystems.
If you want to save your image file on a Windows computer, you will have to share a directory on the windows computer, and gives the read/write permissions to this share. Then, you will have to mount your directory on a temporary directory, and asve the image to this directory.
Here is how to save the sda1 partition of the current linux computer running Partimage to a Windows server having 192.168.0.1 as IP address and sharing Temp:
- mkdir /mnt/samba
- mount -t smbfs //192.168.0.1/Temp /mnt/samba
- partimage save /dev/sda1 /mnt/samba/backup-of-sda1.pimg.gz
If you want to use NFS (Network File System) you will have to do the same with the nfs option instead:
- mkdir /mnt/nfs
- mount -t nfs 192.168.0.1:/temp /mnt/nfs
- partimage save /dev/sda1 /mnt/nfs/backup-of-sda1.pimg.gz
Of course, the NFS server must have its NFS service running.